[ javascript ] 변수 / 상수 / 정렬
오늘의 목표
javascript 에 익숙해지기 위해서, 정렬에 대해서 배워보자
javascript 유의사항
javascript 는 자료형을 안써도 된다
: 동적 타입을 지원해주기 때문.
같은 변수에 서로 다른 값을 넣어도, 에러가 나지 않고 값과 타입이 변한다
변수로는 var 와 let 이 있다. 그러나, 일반적으로 let 을 많이 사용한다
: var는 재선언이 가능해서, 변수가 어디에 선언되어있는지 판단하기 어렵기 때문에
프로그램 상의 오류를 일으킬 수 있어서 잘 사용하지 않는다.
상수로는 const 가 있다. 상수는 변하지않고 일정한 값을 갖는 수를 의미
: 상수로 지정한 후에는 나중에 값을 바꿀 수 없다
javascript 의 변수
: let 으로 선언
-> let apple = 'yummy'
javascript 의 상수
: const 로 선언
-> const arr = [ 1, 2, 3 ]
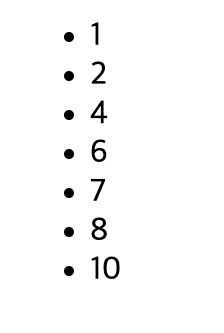
숫자로 구성된 배열 정렬
배열을 만든다
-> const arr = [4, 8, 2, 7, 6, 1, 10]
배열을 정렬하는 함수 toSorted
람다함수식을 사용하여서, 오름차순 정렬
-> const arr2 = arr.toSorted((a, b) => a - b)
(+) 만약 내림차순 정렬이라면?
-> const arr2 = arr.toSorted((a, b) => b - a)
<!DOCTYPE html>
<html lang="ko">
<head>
    <meta charset="UTF-8">
    <meta name="viewport" content="width=device-width, initial-scale=1.0">
    <title>13_sort.html</title>
</head>
<body>

    <ul class="test1"></ul>

    <script>
        const arr = [4, 8, 2, 7, 6, 1, 10]
        console.log(arr)

        // const arr2 = arr.toSorted((a, b) => { return a - b })
        const arr2 = arr.toSorted((a, b) => a - b)
        console.log(arr2)

        const test1 = document.querySelector('ul.test1')
        arr2.forEach((num) => {
            test1.innerHTML += '<li>' + num + '</li>'
        })
    </script>

</body>
</html>
정렬 결과
문자열 배열 정렬
: 자바스크립트는 문자열도 크기비교가 가능하다
정렬 기준 함수를 전달하지 않아도, 문자열로 정렬해주지만
이후 객체 혹은 HTMLElement를 정렬하려면
직접 정렬기준식을 작성할 줄 알아야 한다
정렬함수에 전달되는 콜백함수는 정수를 반환한다
반환되는 정수가 0보다 큰지, 작은지 판별하여 정렬을 수행한다
따라서 작성하는 콜백함수에는 항상 1 혹은 -1을 반환할 수 있도록 처리한다
만약 비교기준이 정수라면 -연산을 이용하여 두 수의 차이만 반환해도 된다
삼항연산자를 이용한 오름차순 정렬
-> const arr2 = arr.toSorted((a, b) => {return (a > b) ? 1 : -1 })
(+) 만약 내림차순 정렬을 하려면?
-> const arr2 = arr.toSorted((a, b) => {return (a < b) ? 1 : -1 })
<!DOCTYPE html>
<html lang="ko">
<head>
    <meta charset="UTF-8">
    <meta name="viewport" content="width=device-width, initial-scale=1.0">
    <title>14_sort.html</title>
</head>
<body>

    <ul class="test"></ul>

    <script>
        const arr = ['승호', '원지', '현웅', '예랑']
        // 위 배열을 정렬하여 ul.test에 출력하세요

        console.log('apple' > 'banana') // "apple".compareTo("banana") > 0
        console.log('apple' < 'banana') // "apple".compareTo("banana") < 0

        const arr2 = arr.toSorted((a, b) => {return (a > b) ? 1 : -1})

        const ul = document.querySelector('ul')
        arr2.forEach(e => ul.innerHTML += '<li>' + e + '</li>')
    </script>

</body>
</html>
정렬결과

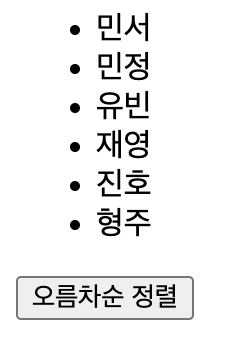
버튼을 클릭했을때 정렬되도록 하기
버튼의 id 가 sortAsc 인 요소를 getElementById 를 이용하여 불러온다
-> const sortAsc = document.getElementById('sortAsc')
정렬 대상을 불러온다
-> const ul = document.querySelector('ul')
CSS선택자로 모든 요소를 NodeList 형태로 불러온다
-> const liList = document.querySelectorAll('ul > li')
NodeList타입에는 sort()가 없기 때문에, 배열로 바꿔준다
-> const liArray = Array.from(liList)
정렬을 수행할 대상들은 <li> 이고, 그 기준은 <li>의 내부 텍스트이다
-> const resultArray = liArray.toSorted((a, b) => { return a.innerText > b.innerText ? 1 : -1 })
정렬을 수행했지만 스크립트내부에서만 적용되기 때문에
문서에 반영하기 위해 appendChild를 수행한다
기존에 있는 요소이므로, 추가하지 않고 자리만 바꾼다
-> resultArray.forEach(e => ul.appendChild(e))
<!DOCTYPE html>
<html lang="ko">
<head>
<meta charset="UTF-8">
<meta name="viewport" content="width=device-width, initial-scale=1.0">
<title>15_sort.html</title>
</head>
<body>
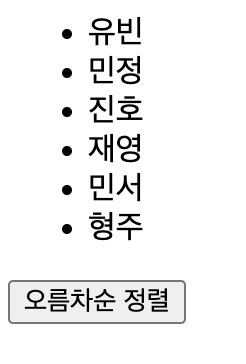
<ul>
<li>유빈</li>
<li>민정</li>
<li>진호</li>
<li>재영</li>
<li>민서</li>
<li>형주</li>
</ul>
<div>
<button id="sortAsc">오름차순 정렬</button>
</div>
<script>
const sortAsc = document.getElementById('sortAsc')
const ul = document.querySelector('ul')
sortAsc.onclick = function() {
const liList = document.querySelectorAll('ul > li')
const liArray = Array.from(liList)
const resultArray = liArray.toSorted((a, b) => {
return a.innerText > b.innerText ? 1 : -1
})
console.log(resultArray)
resultArray.forEach(e => ul.appendChild(e))
}
</script>
</body>
</html>
정렬 결과
왼쪽 이미지 : 정렬 전
오른쪽 이미지 : 정렬 버튼 누른 후
Study_review
자바스크립트는 자료형이 없어서 편하다.
그치만 나는 자바에 익숙해져서인지 자료형이 있으면서도 체계적인 언어들이 더 좋은 것 같다